Showing posts with label paints. Show all posts

Tuesday, November 29

Wanderlust 2016: A Tag Travel Journal


I'm in the middle of one of my Wanderlust 2016 classes with Joanna Grant, and just finished up my first mini journal using shipping tags. 

I LOVE Wanderlust 2016! I have learned an amazing amount of "stuff" and been inspired by some very talented artists. I know I have pushed myself beyond my comfort zone and tried techniques I never thought I would. For example, with this project, I headed totally out of my color comfort  zone to see what would happen...and I really like it! I think I tend to get into color "ruts", and it's a lot of fun to escape that. 

My work space is getting smaller, but I am having fun with my gelli plate and these bright colors, including neons! I used a recycled cup and bottle cap to make my circles. Thank you Carolyn Dube (another Wanderlust teacher) for taking me on a journey into the gelli plate! I bought one a few years ago, and it sat...until this year, when I finally learned to use it.


I decided to try my hand at making some matching washi tape, so I laid out strips of Dina Wakley's Media Tape onto my gelli plate, and added paint.


I found an old number stamp from 1-31 and stamped the tape with this also.


I wanted it to stand out more from the tags, so sprayed and speckled it with white.


I cut out paper rectangles, doodled around the edges, added my washi, and stamped "Journal" onto the cover tag. 


All hooked together, and added some contrasting fibers. Now, this little tag journal is ready to go on a journey. There is space for notes or drawing, and it would be simple to add in some watercolor paper tags to add some sketches, or more journaling sheets - definitely room to expand!


I hope you've enjoyed this project in neon and bright colors! See, I've learned to play with more crayons in the box, so to speak ;)


Tuesday, March 19

Simon Says - Water Challenge!

So, what's a creative girl to do when it snows for hours on end, piles up to 9 or 10", and she has a snow day from school? Well play of course! This didn't start as my idea for the water challenge, rather it evolved as I played. So first, snow day fits the challenge, because as we all know, snow is water!
Then, my son mentioned I got a box...yesterday...and it was my new Tim Holtz Distress paints!! So, of course I had to play with them! Turns out I also received the final Inchies for a swap I was hostessing, and I like to make some kind of thank you for playing along-perfect!!
Chose these to play with, swiped some on my craft mat, spritzed with water, and ran the tags across. Next step, flick some water on them and let them dry.
More play! Trying out the paint for stamping, more color!
One stamp. Three ways. From left to right - first generation stamping - 2nd generation - and then a bit of a spritz with water for the 3rd. Gen. I really like how different they are!
Since my swap included some fabric and sewing, I chose this Tim Holtz "Vogue" stamp with black archival ink. (personally, I was more of a Simplicity gal back when I did more sewing)
Not quite satisfied yet, I mixed a couple of distress stains with...you guessed it...water! I wanted to add a bit of sparkle to the tag.
Final step- black pen to go over the dress, and a bit of white.
Attach some of the distressed ribbon I made as a little thank you, and I am done. It's still snowing outside :)

How would you use your own personal snow day?

Sunday, January 6

Creative JumpStart 2013

Wow! What a week...somehow fit in some creative playtime to try out all the wonderful ideas in Creative JumpStart 2013! If you haven't signed up yet, you really need to! I decided to use tags to try out the techniques, and here is my first week.
First technique was to make my own embossed tape. It's just double sided tape, add embossing powder, heat, and voila!
Here's the tag I created with my tape, plus more colors and doodles.
Thanks Nathalie Kahlbach for that technique. Next one is inspired by Julie Fei Fan Balzer.
First layer is distress inks with the stencil. Second layer is acrylic paint.
Third layer - sprays
Splatter on some paint, add a bit of writing, and I like it!
Loved this idea of laying the tag onto the stencil after the spray ink to get a second hand image. love this!!
Next up in the creative lineup was Heidi Swapp with these ideas to share.
I made a paper mask, then used a stencil and Mr. Huey sprays, then stamped some gears in.
A bit more stamping, some ink flicks, and letters
 Sharon Laakkonen shared a lot of ideas with us, including this next tag I created.

I used a stencil and gel medium. Te stencil had a bit of ink on it, and I like what it did.
Added some distress ink to the background to help the design stand out.
Back to more ideas from Nathalie. Her technique used foam stamps and paint, but I had bubble wrap to play with instead.

Acrylic paints on bubble wrap, then laid punchinella over that and a second paint, before stamping on tag.
Final tag after flicking and doodling.
Love all the fun creative ideas that were shared on Creative Jumpstart this week! Looking forward to several more crafty weeks, and I hope you are too!

Tuesday, January 1

Simon Says Stamp Challenge: Down the Rabbit Hole

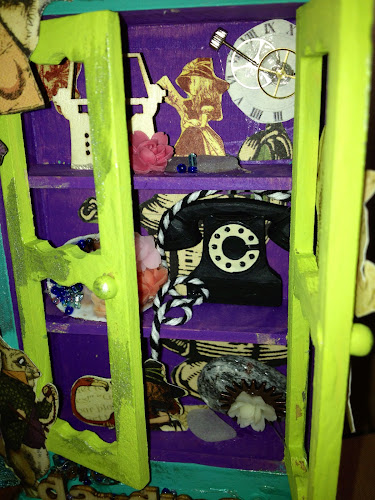
How does a totally mad tea party begin? Start with some wild and bright paint and a small wood cabinet, because you need a place to keep the teacups.
Fussy cut some Graphic 45 Halloween in Wonderland paper
Play and imagine what life is like "down the rabbit hole" and layer, add all kinds of fun things from beads to sea glass to gears...and you get my curio of curiosities with a bit of distress pewter stain.
Side view of some crazy rabbits with some of the distress ribbons I made awhile ago.
Off with her head....the Mad Hatter and the Queen of Hearts...
 Detail of the top
 Curiouser and curiouser....
 Shelf details...telephone, shell, flowers and beads
 Alice, time, Cheshire Cat, old typewriter, sea glass...
 Alice, rock, sea glass...
Ribbons, key, journey coin...

Hmmm, I've enjoyed my adventure down the rabbit hole into the land of imagination and hope you have also! Ready to enter this into the Simon Says Stamp challenge...what a great way to start a new year!

Saturday, May 19

"Secret" Swap

Secret swap with my art group - I started with this box kit that I had in my stash.
Played with alcohol inks to create the boxes
Next, I took my new mask by Balzar Designs and some mists, and layered the peacock feather on to the boxes.
A new Tim Holtz background stamp with some archival ink around the box edges
Rubbed some distress ink over the archival ink designs, then a bit of rubbing to let them shine through
Stamping with bubble wrap and paint - I love the texture this gives!
Added in some purple paint dots to the design
Painted the outside of the box with a mix of acrylic paint and irridescent paint
Used my mask and sprays again on the outside of the box, then added some detail with a metallic pen
Stamped "passion, desire and believe" on the outside of each box, then glued the boxes into place
Side and top view of the finished box
Added some hardware and a ribbon for closure, then, off it went to the secret swap
I hope the recipient finds some great uses for this box!


Products:  Tim Holtz, Crafter's Workshop, Dr. ph Martin, Stampa Rosa, Post Modern Design

LinkWithin

Related Posts Plugin for WordPress, Blogger...

Pinterest