 |
| Click to visit the blog! |
You never know what will pour out of a bottle in the Steampunk world!
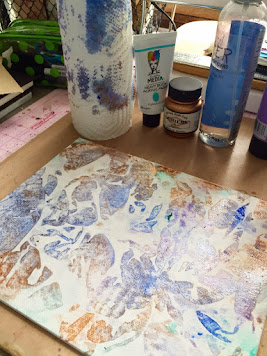
Canvas and acrylics to begin the project. I chose some of my favorite colors, purple, blue and green, and of course some metallic paint, and watered them down to a thin consistency.
Wet the canvas, painted on my colors all over the place, spritzed a bit more water as needed to make the surface nice and wet.
What do you do with all of those plastic bags you bring home? Well, they work really well to add some great design texture into your background. Just smooth it down over the wet paint, the more wrinkles, the better. Next step is the hardest..patience...let it sit for 6-10 minutes.
I rolled my paper towel roll over it and picked up some of the paint. If you want richer color, let it dry completely. Doesn't it make a cool design?
Next, some acrylic color wash over the background.
Time for a cup of coffee while I wait for things to dry, and start some of the other parts.
Stamped the flying man image by Deep Red and the bottles by Hampton Art/Graphic 45 on watercolor paper. Painted them with my watercolors, not too worried about staying in the lines, as I was detail cutting them.
Paint up the ripped cardboard, seal all of my stamped images with Ranger's Glue and Seal. I am envisioning this as a shelf.
Add the branch, and it is starting to look like a shelf.
I decided I wanted more texture in the background, so laid on a thick layer of Finnabair's clear crackle Texture Paste. I learned a thick layer takes a long time to dry. Rubbed brown ink over the surface to bring out the crackles. It's starting to come together.
Ok, let's start to lay it out. I wanted it to look like the overturned bottle was pouring out all the machine parts to make the flying men. I had previously made my first acrylic skin, and this seemed like the perfect time to use some of it.
I need some big gears on this collage! Love these wood gears from EKsupplies!
Of course, I need metal gears and cogs too! Love how it all layers up.
Shelf and bottle details, a few gears...
Imagining this was in a laboratory, so had to have some tools hanging from the shelf.
Had so much fun gearing up my flying men! I can imagine I am up there in the aether flying right beside them.
And, now everything is geared up and complete
I had so much fun creating my "Gear it Up" collage for Steampunk challenges. I love steampunk and hope I have inspired you to join us. Thanks for stopping by for a visit!


I adore your creation, Maura!
ReplyDeleteAnd your background technique is fab! Will have to give this a try too! Thanks for the wonderful inspiration. But most of all I love the story behind your canvas - steampunk being poured from a bottle on a shelf (with more bottles with magical steampunk liquids in them)...that really starts the gears in my brain turning and evolving ideas of a possilbe story behind the image.
Love love love this!
Have a wonderful Sunday!
Claudia x
Wow!!! Fantastic, what a great inspiration, love the idea with the branch as shelf and the creative story with the flying man (it's also my favourite) Best whishes Kerstin
ReplyDeleteThis piece is just amazing, as is the story behind the creation. Every time I look at it I see something new. Your brain created a wonderful art piece! Loves it! Hugz! ~Niki
ReplyDeletec est fabuleux la façon dont vous avez crée cette page merci pour tous ces détails c'est superbe
ReplyDeleteà bientot nate
Stunned - just completely in awe... this is THE BEST... LOVE LOVE LOVE it. Everyone here loves it. WOW. Work of art.... FANTASTIC. PERFECT. j.
ReplyDeleteBonjour, je te remercie de ta visite sur mon blog ainsi que de ton commentaire qui m'a fait très plaisir. J'ai été ravie de pouvoir participer à votre challenge et j'espère que je pourrai continuer.
ReplyDeleteTa création est magnifique et que de travail !
Je te félicite.
Bonne journée à toi aussi.
ADA
This comment has been removed by the author.
ReplyDelete