
I'm over at the N*Studio Creative Squad today sharing how I created my bookmarks for this month's theme "Doin' My Thing" HERE.


In case you missed it...
True Blue

There are so many blues around to inspire us to create with them. Think about the many variations of blue in the sky, from a clear sunny day, to a dark and stormy one. Think about all the blues in the water - oceans, rivers, ponds, and glaciers. Then, there are all the blues in textiles, paints, jewelry, flowers, rocks (turquoise, bluestone…), and even trees, like the blue spruce. When you begin to think about all the places you observe blue, you truly realize it is all around you!
I decided to make a set of blue holiday cards, and pulled out my small 6 x 6 gelli plate to work with. To begin, I added a few squirts of the DecoArt Premium paint in Cobalt Teal Hue and Ultramarine Blue and blended it with my small brayer. Then, I laid the Hamilton Stencil down on the plate and pressed my watercolor paper down onto it.

I lifted the stencil, and pressed the paper down onto the plate to get my second print (which I love!).

I repeated the process, this time using the fluid acrylics in Cobalt Teal Hue and Ultramarine Blue. I was curious to see the difference in the prints using the heavy body and fluid acrylics.

I set the backgrounds aside to dry, and prepared for stamping. I mixed Ice Blue Dazzling Metallic and Electric Blue Neon paints on the gelli plate with my brayer. The gelli plate makes a great surface that allows the stamp to easily pick up the paint to make a good impression. I used the large Broadway circle and topper, and the small Broadway circle to stamp out the designs on watercolor paper.


I decided to add a wash to the large circle designs, and added a bit of water to the Cobalt Teal Hue fluid acrylic and washed over the stamped areas using a large flat brush.

Next up, another layer, this time spritzing on Turquoise Shimmering Mister over the large circles.


The final step before assembling the cards was to add some highlights with a silver pen.

I cut a piece of navy cardstock to go behind each background, and layered the elements on top, popping them up a bit with foam tape. Then, I added a small glue dot behind the topper and attached some embroidery thread.
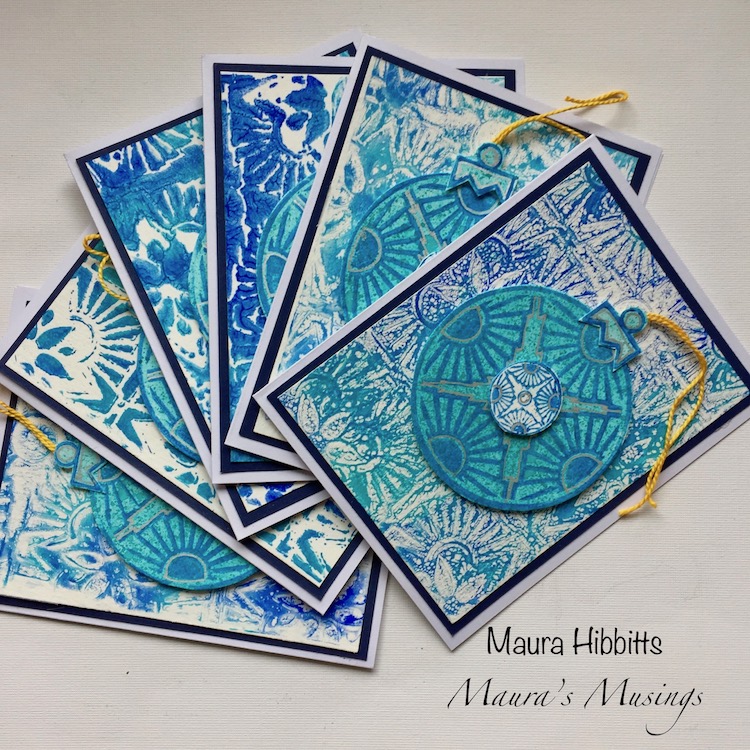

Time to package them up and tie them with a pretty blue ribbon!

I love the many variations of blue I got by just using a couple of colors and blending them, and now I have a lovely set of six holiday cards. Thanks for joining me!


Beautifully artistic bookmarks & the Christmas cards are amazing! I still haven't used the gelli plate I've had for several years. Guess that goal gets moved to next year--haha!
ReplyDeleteYou should keep it up forever! Best of luck
ReplyDeleteWonderful article! We are linking to this particularly great content on our
ReplyDeletewebsite. Keep up the great writing.