I am taking an online class over at Big Picture Classes by Claudine Hellmuth - "Technique Toolbox." Since it is summer, I thought I would stay right on top of this, but no, I ran behind, so am catching up to the first two weeks.
I learned some great techniques so far, like color tinting B&W photos, and transferring images.
I put some of the techniques I learned together on this collage tag. Behind it is my not so great attempt at doing a watermark resist (what I had did not work - learned I really need the reinker to make it work). Color tinted the bird's nest and decided to add a little saying, and some bling.
Now, for "rust never sleeps"...I just had to fit in that Neil Young song for the rust challenge over here at Steampunk Challenges.
So, here is my tag for the challenge...and yes, there is a rusty star and rust colored ribbon I made.
Started out by embossing some canvas and coloring it with distress paints. You can see some of the detail here. I have to figure out how to use the leftover embossed canvas backing...any ideas? I love how the design is "etched" into the canvas with the paints.
Created dimension with all kinds of goodies - a little light bulb, a word bar, watch parts and gears, ribbons...
Exhibit #1 - "To embrace imperfection" this is definitely a lesson I have learned in my creative life. So often what I start to follow in my mind's eye, just does not translate into what I am making. Many, many times I have said, "it's just paper, it's ok", or have made a happy discovery through a mistake. Often, it is easy to work around the imperfection, but there are times it is just best to deep six it! Now, if I was only better at accepting imperfections in myself and my life...still working on that.
Showing posts with label çhallenge. Show all posts
Friday, July 26
Wednesday, June 26
Patriotic Stripes (and stars): Simon Says and Camp Scrap challenges
Simon Says Stamp and Show has a challenge this week to use stripes. Since next week is the 4th of July, and I had some great patriotic themed paper from Authentique, and Stamp Camp is coming up, this was the perfect blend for working with stripes!
I started off by embossing a 4 with my new Tim Holtz Alterations folder, then sanding over the four to make it stand out, then distressed the edges. Funny story...I thought I was purchasing the die to cut out the numbers, and when I opened the package, I was a little disappointed, but what the heck! I tried it out, and it's actually pretty cool. They are ATC size, so that is whirling some gears in my brain.
Keeping things simple, I went for three blocks of color in the red, white and blue. The left side kind of reminds me of a firecracker. A little ink around the edges, a bit of frayed Eclectic Element fabric, and almost done. Honestly, I am finding myself being pretty miserly with my fabric pieces...I just don't want to use it up :)
Once I stamped the word "Liberty" (Art Impressions) across the card, and added a little stamped element (stamp by Heather) to the envelope, the card is ready for a patriotic celebration of stripes and stars!
Also, now that I am finally finished with the school year, I have time to play at camp - Camp Scrap that is! My card fits the first week project of "finish with a stamp" because that is just what I did!
I started off by embossing a 4 with my new Tim Holtz Alterations folder, then sanding over the four to make it stand out, then distressed the edges. Funny story...I thought I was purchasing the die to cut out the numbers, and when I opened the package, I was a little disappointed, but what the heck! I tried it out, and it's actually pretty cool. They are ATC size, so that is whirling some gears in my brain.
Keeping things simple, I went for three blocks of color in the red, white and blue. The left side kind of reminds me of a firecracker. A little ink around the edges, a bit of frayed Eclectic Element fabric, and almost done. Honestly, I am finding myself being pretty miserly with my fabric pieces...I just don't want to use it up :)
Once I stamped the word "Liberty" (Art Impressions) across the card, and added a little stamped element (stamp by Heather) to the envelope, the card is ready for a patriotic celebration of stripes and stars!
Also, now that I am finally finished with the school year, I have time to play at camp - Camp Scrap that is! My card fits the first week project of "finish with a stamp" because that is just what I did!
Sunday, June 9
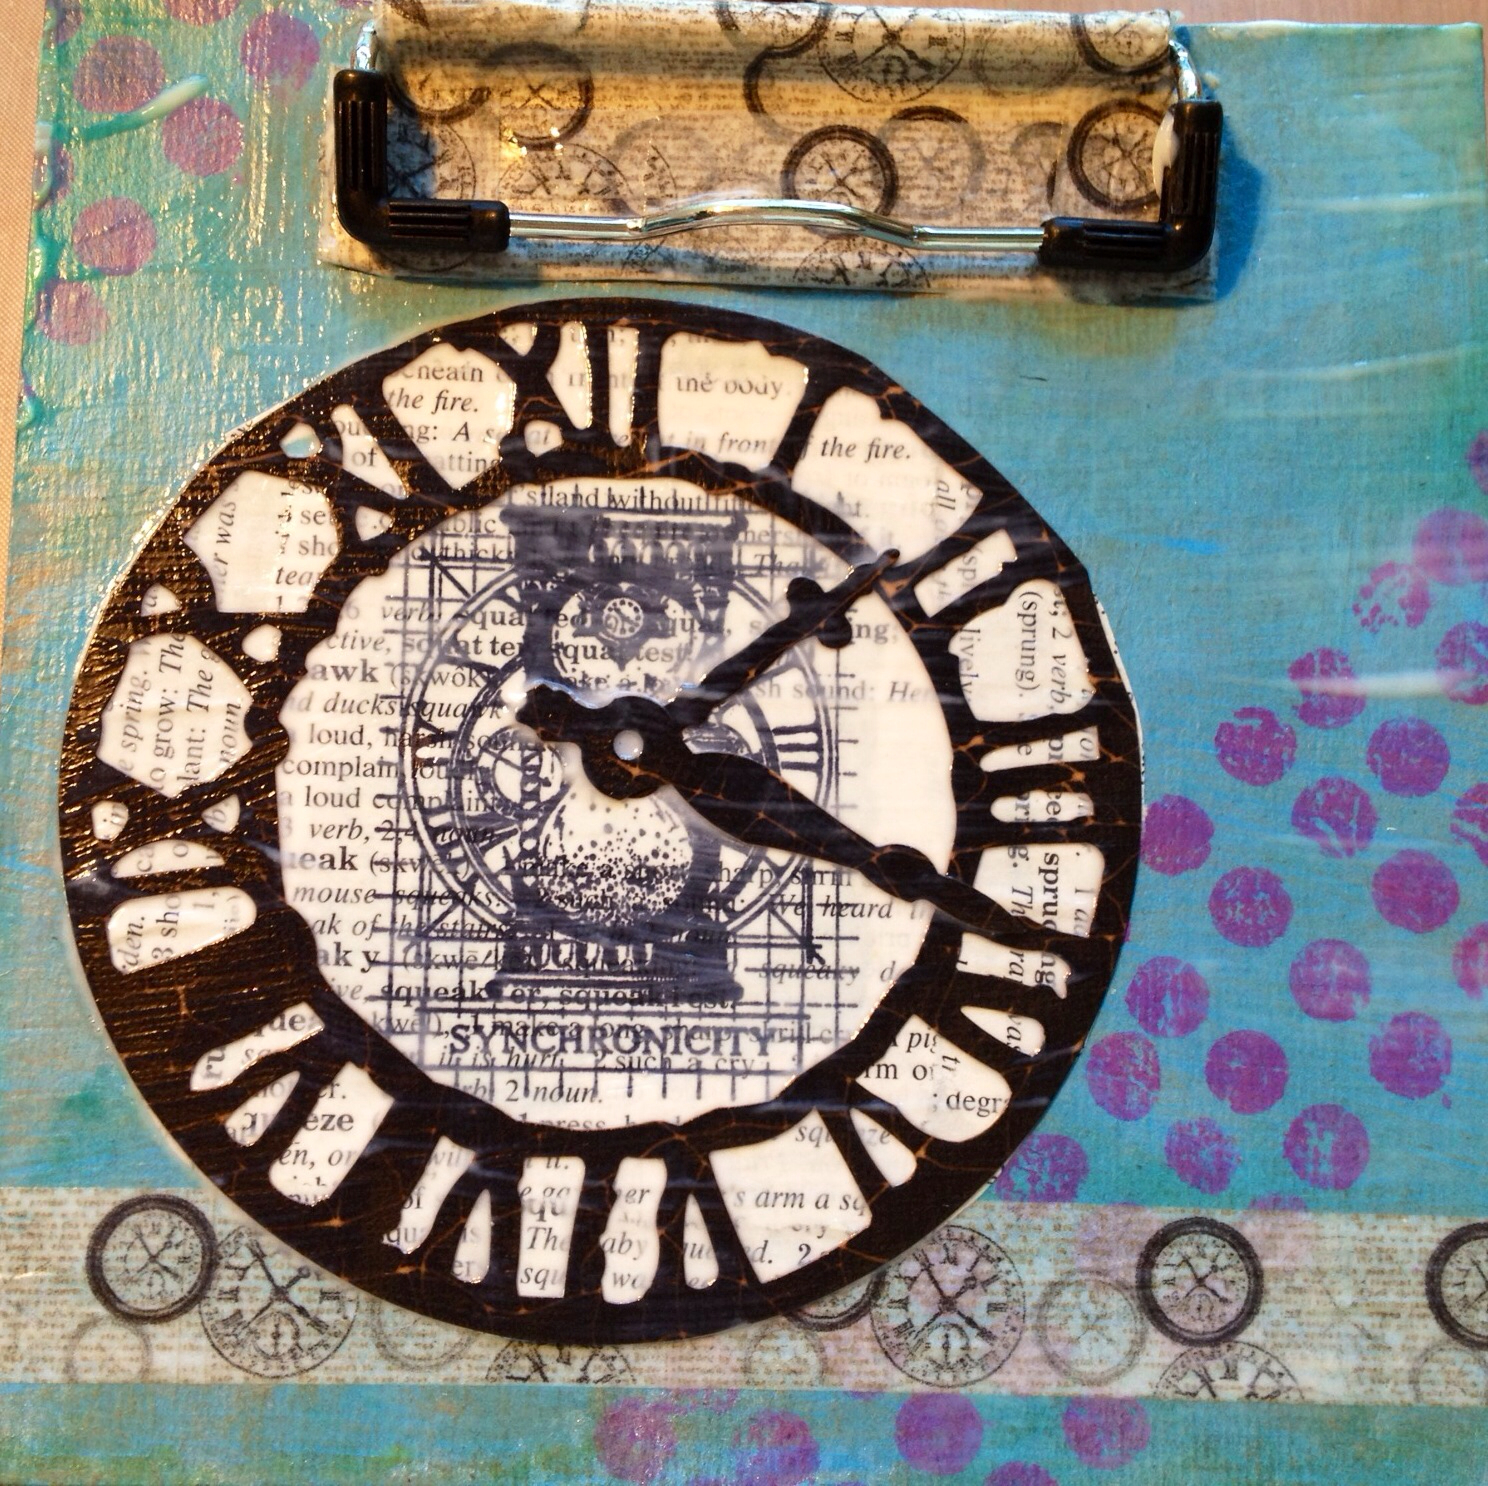
Synchronicity: Simon Says Challenge...the Letter S
It all started with a stamp by Stampers Anonymous...
S is for synchronicity...background is a page from the S section of the dictionary
Raw materials - a mini clipboard, the stamp, and Tim Holtz clock (seconds?) die
Painted clipboard with Salty Ocean
Stamped spots, made Streaks and Sparkles
Back of the clipboard...tissue tape with minutes and Seconds (?)
Front of the clipboard (Still drying) and soon ready for Secret notes
Synchronicity: coincidence of events that seem to be meaningfully related....yes, I see that with creative crafting and the Simon Says challenge.
Finished! Dry and added some distress ribbon.
S is for synchronicity...background is a page from the S section of the dictionary
Raw materials - a mini clipboard, the stamp, and Tim Holtz clock (seconds?) die
Painted clipboard with Salty Ocean
Stamped spots, made Streaks and Sparkles
Back of the clipboard...tissue tape with minutes and Seconds (?)
Front of the clipboard (Still drying) and soon ready for Secret notes
Synchronicity: coincidence of events that seem to be meaningfully related....yes, I see that with creative crafting and the Simon Says challenge.
Finished! Dry and added some distress ribbon.
Thursday, May 30
Steampunk Challenge: Altered Playing Card
The challenge for May is to alter a playing card, over at SanDees and Amelie's blog. We only had to leave a corner visible and make it steampunk. Here is what I came up with to enter.
Sources: Graphic 45, Tim Holtz distress products and ideology, punchinella washers and odds and ends.
Monday, May 27
Simon Says: Into the Woods challenge
Around my neck of the woods, as well as many other fine places, Memorial Day weekend is the start of the camping season. Along with camping, spring and summer bring fire season, so with those themes playing in my head, I started in on the Into the Woods challenge.
A lot of stories and myths revolve around trees and forests, so of course, I am thinking about these...like the Green Man, or wood spirits.
Lucky for me, no one bought these at a scrap yard sale, so this wood texture plate by Creative Mode was perfect to make a wood grain background. Now the question was how? I thought about rubbing pencil or marker, but wasn't sure, so next I tried rubbing some distress ink on the plate and pressing the tag onto it. Love it!
Next, I stamped the "face of uncle Enos" by River City Rubberworks onto the tag with Ranger's black Archival ink. I wanted the spirit of the woods to come through.
Pulled out my Happy Camper set by Stampin Up, and added the trees with Forest Moss Distress paint.
Since I was thinking of the forest fire message too, I added in the campfire in bright Ripe Persimmon.
I like to layer and add texture so stamped these onto canvas using an old stamp from Stampers Anonymous. Decided to use the evidence one and colored it up with Distress ink and stain. (Aged Mahagony and Ripe Persimmon)
Once I started putting the tag together, I had to add the wise old raven (Rubbermoon) who keeps an eye on everything that goes on in the forest. A little fussy cutting, and he nestles right in to the distressed ribbon and twig.
Here is the whole tag and nothing but the tag...my wise old man of the forest keeping a watchful eye over the campers and forest creatures.
A lot of stories and myths revolve around trees and forests, so of course, I am thinking about these...like the Green Man, or wood spirits.
Lucky for me, no one bought these at a scrap yard sale, so this wood texture plate by Creative Mode was perfect to make a wood grain background. Now the question was how? I thought about rubbing pencil or marker, but wasn't sure, so next I tried rubbing some distress ink on the plate and pressing the tag onto it. Love it!
Next, I stamped the "face of uncle Enos" by River City Rubberworks onto the tag with Ranger's black Archival ink. I wanted the spirit of the woods to come through.
Pulled out my Happy Camper set by Stampin Up, and added the trees with Forest Moss Distress paint.
Since I was thinking of the forest fire message too, I added in the campfire in bright Ripe Persimmon.
I like to layer and add texture so stamped these onto canvas using an old stamp from Stampers Anonymous. Decided to use the evidence one and colored it up with Distress ink and stain. (Aged Mahagony and Ripe Persimmon)
Once I started putting the tag together, I had to add the wise old raven (Rubbermoon) who keeps an eye on everything that goes on in the forest. A little fussy cutting, and he nestles right in to the distressed ribbon and twig.
Here is the whole tag and nothing but the tag...my wise old man of the forest keeping a watchful eye over the campers and forest creatures.
Sunday, May 19
Challenge: A Little Paper
Simon Says Stamp challenge this week is using little paper, or larger paper in a small size, or... So, I am taking up the challenge while at the same time making a couple of birthday cards for my sons this week.
Play time! Distress markers, inks, Tim Holtz paper, stamps, etc. Ready for some fun!
I chose the ticket stub paper by Tim Holtz, and even ran it through the Big Shot to add texture! Small pieces of a larger one, and the tickets make a perfect background for my time traveling gentlemen. The time travelers are stamped on canvas, and then I used a water brush with my distress markers to get this look.
Love these new buckles, and I pulled out some distress ribbon I made, to add another element to the card.
Now, all that remains is choosing which card goes to which son...
Play time! Distress markers, inks, Tim Holtz paper, stamps, etc. Ready for some fun!
I chose the ticket stub paper by Tim Holtz, and even ran it through the Big Shot to add texture! Small pieces of a larger one, and the tickets make a perfect background for my time traveling gentlemen. The time travelers are stamped on canvas, and then I used a water brush with my distress markers to get this look.
Love these new buckles, and I pulled out some distress ribbon I made, to add another element to the card.
Now, all that remains is choosing which card goes to which son...
Labels:
cards,
çhallenge,
distress inks,
steampunk,
Tim Holtz
Thursday, May 9
Simon Says Challenge: Inspired By...
I can find a lot of inspiration in the creative work of a number of people I follow, but I narrowed this challenge down to two of my favorite inspirations - Tim Holtz and Steampunk.
I also have a challenge with my art group to create a giant tag with a spring theme, and I think this works for that also.
Background and tried clear resist for the gentleman. It looked ok until I added the sky.
Used these on the bottom of the tag for the "ground".
Used these on the "sky".
Wanted the man to stand out more so went over him with the archival ink.
Stamped the air balloons with archival ink.
Working out some different ideas for the tag.
Up Up and Away for a spring adventure...tea anyone? Travel? Gardens? Imagination? Well, it says spring to me at least :)
Happy Spring everyone!
I also have a challenge with my art group to create a giant tag with a spring theme, and I think this works for that also.
Background and tried clear resist for the gentleman. It looked ok until I added the sky.
Used these on the bottom of the tag for the "ground".
Used these on the "sky".
Wanted the man to stand out more so went over him with the archival ink.
Stamped the air balloons with archival ink.
Working out some different ideas for the tag.
Up Up and Away for a spring adventure...tea anyone? Travel? Gardens? Imagination? Well, it says spring to me at least :)
Happy Spring everyone!
Sunday, May 5
Simon Says-Passport Challenge
I decided to do a scrapbook layout, since yesterday was National, or should I say, International Scrapbook Day! I also wanted to get in on the challenge at Simon Says Stamp, especially since I have missed out on the last couple of ones because I just could not find the time. So here is my Passport to Fun layout.
What do you say, to doodle or not to doodle? I'm going to also link up to The Purple Mailbox Layout Love Linky.
Sheila, you may have noticed some cool items on my layout that "flew" from you to me! Thanks!!
What do you say, to doodle or not to doodle? I'm going to also link up to The Purple Mailbox Layout Love Linky.
Sheila, you may have noticed some cool items on my layout that "flew" from you to me! Thanks!!
Sunday, April 14
Simon Says Fly Challenge
This page in my art journal fits this challenge perfectly.
All kinds of "fly" imagery here, from the word with scrabble tiles, to the saying, to the butterflies (background is a napkin) to the feeling that time is flying - porcelain girl, to my wish that time would fly faster and bring some spring with the flowers.
Fly off little art journal to the challenge here.
Saturday, April 13
Happy Art Flag Challenge
I will soon be off to take a class with Tim Holtz in Connecticut, and the store there is holding an art flag challenge to celebrate Tim and Mario coming to visit, and then they will use the flags in public spaces to bring good will and cheer to folks. Of course, I had to make one, and as you will see I am also thinking ahead to Earth Day as it is around the same time as class.
Eyelets, distressed ribbons, grunge board, distress paints and inks, and Perfect Pearls...
Tags, up cycled packaging, rock candy...
Stamping on plastic, filling the little wells with Distress Stains and Crystal Accents, then some beads, words...
Dimensional view...
Combine all together, and you get my happy flag!
On the back you can see some of the stenciling I did also. I pulled out some materials I had not played with in a long time, which made this extra fun. So, there you have it - my art flag with recycled packaging - that ought to make Mother Nature happy.
Eyelets, distressed ribbons, grunge board, distress paints and inks, and Perfect Pearls...
Tags, up cycled packaging, rock candy...
Stamping on plastic, filling the little wells with Distress Stains and Crystal Accents, then some beads, words...
Dimensional view...
Combine all together, and you get my happy flag!
On the back you can see some of the stenciling I did also. I pulled out some materials I had not played with in a long time, which made this extra fun. So, there you have it - my art flag with recycled packaging - that ought to make Mother Nature happy.
Tuesday, April 9
Clockwork Princess
I recently came across a very cool website with steampunk challenges...oh, be still my heart! And felt right at home. I missed their very first challenge, but am ready for this one: Fairytales into a Steampunk World.
I have an upcoming art swap and the challenge was to make a ribbon doll, and that is how the Clockwork Princess came to be.
As you can see she is a real metal head all geared up and ready to roll. Ideas are always spinning in this gal's head!
Started off with a Graphic 45 image from the Steampunk Debutante line and layered it onto cardboard. I stamped the face and added that on. A bit of color using my Distress Markers, and buttoned her camisole right up.
Cinched in her waist for that Victorian hourglass figure, added the ribbon skirt and a bit more lace to bring it all together...
She needed some jewelry, so she now has 2 bracelets made of jump rings and washers. Jewelry is always useful in the steampunk world, and these are no exception - one never knows when a washer will be needed.
Details of the ribbon skirt with all kinds of nuts, washers, cogs tied into the skirt. This princess is ready for whatever may come her way.
The adventures of the Clockwork Princess have only begun!
I have an upcoming art swap and the challenge was to make a ribbon doll, and that is how the Clockwork Princess came to be.
As you can see she is a real metal head all geared up and ready to roll. Ideas are always spinning in this gal's head!
Started off with a Graphic 45 image from the Steampunk Debutante line and layered it onto cardboard. I stamped the face and added that on. A bit of color using my Distress Markers, and buttoned her camisole right up.
Cinched in her waist for that Victorian hourglass figure, added the ribbon skirt and a bit more lace to bring it all together...
She needed some jewelry, so she now has 2 bracelets made of jump rings and washers. Jewelry is always useful in the steampunk world, and these are no exception - one never knows when a washer will be needed.
Details of the ribbon skirt with all kinds of nuts, washers, cogs tied into the skirt. This princess is ready for whatever may come her way.
The adventures of the Clockwork Princess have only begun!
Subscribe to:
Posts (Atom)