Showing posts with label Eclectic Elements. Show all posts

Monday, November 13

It's a Stitch Up!


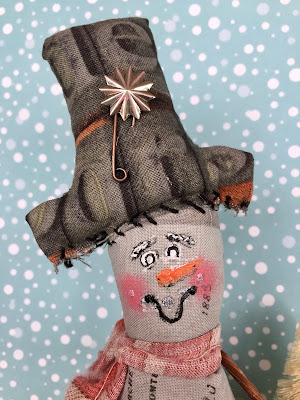
Hello Monday, my friends! We have a new challenge for you this week - It's a Stitch Up! and we are all about adding stitching into your project for the challenge - real or faux. I went for the real deal and pulled out my sewing machine to create a sweet little snowman. I think the cooler temperatures inspired me to make this little fella.


I started out by roaming through Pinterest for some inspiration, and then sketched out my idea.


Next, I cut out the pattern pieces, and added about a 1/4 inch to them when I cut the fabric, for the seams.  There are lots of patterns out there if you don't want to make your own


Remember to put the printed sides facing each other when you sew, then turn them inside out.


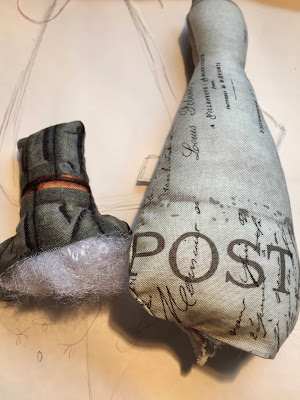
Time for the stuffing! A skewer or pencil is helpful to push the filling into the corners. 


I stitched the hat right to his head, added the pin and star, then painted his face. I didn't like what I did at first, so smudged out some areas and redid it - not too visible.


I tore a strip of the red and white fabric for the scarf, found some florist type covered wire to make the arms, and added tiny jingle bells to tiny safety pins for decoration.


Here's the back - to make the arms stable, I wrapped the wire around the neck and brought it down.


When I showed him to my hubby, he said it looked like it came from Tim Burton's Nightmare Before Christmas - I'll take that! I think it's the skinny head, LOL!


I haven't done much sewing lately, so this was a lot of fun to design and stitch up! Now it's your turn to do some stitching and share your project with us - you just might win the $50 voucher our generous friends at Simon Says Stamp offer each week! 


SUPPLIES:  


A great place to shop!!


Simon is on Instagram, use #sssmchallenge.


Bet the design team is Stitching Up a storm! Let's head on over and check it out!


Monday, July 24

The Brave Little Steampunk Tailor


Hello Monday my crafting friends! Of course you know we have a brand new challenge for you this week - "You've Got the Edge" where its all about the edge of the project, or using edges like die cut frames, so start your imagination rolling! 

Honestly, I never know where inspiration will come from...I began my project for this week thinking I  would go edgy with steampunk, and then I read one of the rulers I'm using, and it totally took me in a new direction. Yep, that's the one below.


Of course, it could also be that I just finished reading this short story by A.W.Exley which is part of the Serenity House series - kind of a zombie apocalypse series (not my usual reading, but I really like the author). The story is loosely based on the tale of the Brave Little Tailor, you remember the one - "seven with one blow" which were really flies he swatted, not giants he killed, but people hear what they want to, right?
So, when I read Merchant Tailor on the ruler, my imagination took a sharp turn in this direction!


The Brave Little Steampunk Tailor


I started my project with a 6x6 canvas and collaged on some French Industrial paper. My plan in the beginning was to have a lot of this show through...you will see what happens.


Using the gear stencil and texture paste, first dimensional layer is added and set aside to dry.


A first for me - I am trying out Prima's paper clay and a Vintage Medallions mould. Since I couldn't make up my mind which ones I wanted to use, I made them all! Now, I will have a few on hand for projects. I let these dry overnight.


Would you believe I've had this Rusty Paper for a long time, and just opened it now? (if you are like me, then you likely would believe it :) I went over most of it and made this my base layer. I did go in with a baby wipe and take some off the faces.


I love a blue and rust combination, so I started layering paint, and adding another layer with the harlequin stencil.


I added some highlights of gold and copper, stamped in some numbers, and stamped my "face" parts onto scraps of the French Industrial paper. Later I went in and blended in some distress oxide inks (salty ocean and peacock feathers).
You can see by the end, not much shows of the collaged papers I began with. 


I wanted the rulers to contrast a bit with the canvas, and wiped the distress oxide inks onto a craft sheet, spritzed it with water, and repeatedly laid the rulers down onto it. 


Closeup of my steampunk tailor. Be brave fit into my idea perfectly, because after all this is the story of the brave little tailor.


Close up of some of the medallions - painted and highlighted.


One of the joys of creating is letting your imagination fly free and see what you come up with! I wanted to add in some sewing details, so threaded a few bobbins, and stuck some pins in them.


I went edgy with these cute little Tim Holtz rulers, and I am wondering what kind of edge you will create! I hope you join in the fun - you could win a $50 voucher to shop at Simon Says Stamp!! 


SUPPLIES:


A GREAT place to shop!! 

Simon is on Instagram! Use #sssmchallenge.


Wondering what kind of edge the design team has this week? Let's head on over and find out! 


Monday, July 17

You're a Star Gift Containers


Hello Monday, my friends! Are you ready for a new challenge? This week we are "Getting In Shape" and going 3D and using different shapes - we are moving away from flat to creating something shapely! Whew! It doesn't mean we have to go to the the gym, swim,  walk, or do yoga...but I have learned to like doing those things too, LOL!

The Fourth of July had me seeing stars, which inspired me to work with these neat wooden stars from Seth Apter and decorate a couple of gift containers.  I found these corrugated pillow boxes in my stash, but you could easily make them with a die and some lightweight cardboard. 


My plan when I began was to make one. I stamped the words onto the lined paper, making sure it would fit into the wooden star. 


Next I added a piece of Media Tape (Dina Wakley), then wiped down the distress oxide on either side. I spritzed a bit of water and wiped a bit off, then let this dry. 


I glued the star onto the paper, cut it out, and added in some 28 Lilac Lane embellishments.


I ripped the Eclectic Elements fabric to make "ribbon," tied it around the box, and used a clip to attach the star. This way the recipient could use it too. Oh, Before I did that, I wiped some black ink across the corrugated cardboard to bring out the design a bit more. 


Once I finished this one, I liked it so well, I had to make another!


I used the other part of the star and added a big button with red thread to the center. Tip:  put a drop of Diamond Glaze onto the thread to keep it from coming untied. I added some more 28 Lilac Lane embellishments around it...


...then added in some blue mica powder and micro beads. I randomly swiped the box with Faded Jeans Distress Oxide.


Now, all I have to do is reach into the drawer for a starry gift box for someone special!


Are you ready to GET IN SHAPE? I'm talking about the crafty fun version, remember! All you have to do this week is make something shapely and share it with us for a chance to win a $50 voucher from Simon Says Stamp, or you might see yourself up in our Spotlight!

SUPPLIES:


A GREAT place to shop!!


Simon is on Instagram! use #sssmchallenge


Be sure to head on over to the challenge blog to see how all of the fabulous DT is getting in shape this week!


LinkWithin

Related Posts Plugin for WordPress, Blogger...

Pinterest