Showing posts with label treats. Show all posts

Tuesday, September 24

Tim Holtz STAMPtember 2019!!


WOWZERS!! 
Did you catch the Facebook Live at noon with Tim Holtz and his AWESOME STAMPtember release with Simon Says Stamp??? 
This is one amazing release...love, love, love it, and I know you will too!!

Remember, all the Simon Says Stamp collaborations are a limited quantity, so order right away. 


I was thrilled to receive this set from Simon Says Stamp, so that I could create and share with you! It is a set of 6 stamps, plus a stencil. All materials I am using here are available for purchase at Simon Says Stamp. 

I decided to make treat bag toppers filled with yummy chocolates. 


I embossed all of the images on watercolor paper using Tim's embossing ink and Black Soot Distress embossing powder. Then, I used a water brush with the inks and added color around each image. I decided to leave the images in black and white. Aren't these images so cool?!


I wiped the excess ink off on Tim's worn wallpaper for my topper holders. 


Then, I stenciled the stars using brushed pewter Distress Paint. 


Of course, I had to do a topper for each of these stamps!


I had so much fun making these, perfect to give as gifts or treats at Halloween!

Thanks so much Simon Says Stamp for the opportunity to share with with all of you, and Tim! wow, what an uber fun STAMPtember set!!! You ROCKED this!!


Be sure to check out the Facebook Live event Tim had at noon if you missed it!! 


Wednesday, February 13

Valentine Goodies

Here are this year's Valentine goodies:

They are quick and simple and you can embellish them however you'd like. I've had those little heart rhinestones for years now and finally found a good use for them. You can find the template and instructions here:

Wednesday, December 12

Christmas Goodies

Here are this year's holiday treats:

This tutorial explains it best.

Supplies: Hershey Chocolate Bars, snowman wrapper is by Laurie Furnell Designs found HERE as a free download, fleece, jingle bells. 

Pretty simple and inexpensive and just darn cute.

Sunday, November 25

Simply Thankful - Simon Says Stamp Challenge

I made this little treat box for the challenge this week, and filled it with some yummy goodies. Corrugated cardboard, some patterned papers, Twine, a bit of ink and there you have it - Simple and Sweet.

Tuesday, November 20

A Rafter...

did you know that a group of turkeys is called a rafter? Neither did I-thank goodness for Google. 

I've been super busy lately but somehow managed to find the time to make these.
 Here they are all packaged up and ready to go.
I found them on Pinterest and followed the step-by-step instructions here
The hardest step? Not eating all the turkey parts.
Happy Thanksgiving.

Saturday, August 25

It's that time of year again...

Here are this year's neighbor goodies for back to school time.


I found the idea via Pinterest HERE and just tweaked it a bit for my use.

Thursday, May 31

End of School Goodies

These are the end of school goodies that I made for my 
husband's co-workers and the neighbor kiddies. Simple and easy. 
I can't find the original source-sorry.
And the lemon drops were a big hit.

Thursday, April 5

Easter Treats

Here are this year's Easter treats....
I modified an egg box template to include bunny ears.
And every bunny needs a little tail....
They are just big enough for a few little chocolate Easter eggs.
Here comes Peter Cottontail......Happy Easter!

Monday, February 13

Valentine Goodies

Here are this year's Valentine's Day goodies. I hadn't made this style yet and remembered Maura's version (HERE) so I decided to try it out. I really like them. Simple but still very cute.

I like the added detail of the crimped ends. I honestly think this was the first time that I ever used that tool but I sure am glad I had it!

Here's how:

Video from Splitcoaststampers.

Happy Valentine's Day!

Wednesday, December 21

Holiday Goodies

Here are this year's holiday goodies:
I wrapped the yarn around two candy canes and adhered with hot glue (that's the biggest tip I can give because every other adhesive I tried did not work). Then glue on the eyes and red nose. I wrapped a red ribbon to hold the jingle bell and the hand stamped tag.

Wednesday, October 26

Witch's Brooms

Here are this year's Halloween goodies:
 You need two paper bags for each broomstick. I used the small size from Michael's that are about 6" x 2". Unfold one bag and push out its base while folding in the left and right sides. Use scissors to cut the bag into thin strips right down to the base fold. Cut thin strips into the top inch or so of the second bag.
Open both bags and place the second bag inside the shredded one.
 Add Halloween candy of choice--I went with the classic candy corn. Insert a small branch into the bag. Cinch the tops of both bags and secure with ribbon. Add a cute tag.

There's a lot of great Halloween inspiration here at TwoCraftingSisters!

You might also enjoy checking out a how-to for a Halloween treat jar HERE.
Or, a fun Halloween card HERE.

Monday, October 3

Halloween Treat Idea from Michelle!

Our friend Michelle put together these adorable treat holders for a little friend of hers to take in to school for the Halloween party.  She used the new Stampin 'Up bags, filled them with colorful Skittles, backed them with themed paper, and added the cute stamped topper to them.  Looks like a treat the kids will love!

Thanks for sharing, Michelle!

Sunday, September 11

Another punch idea

Here is yet another way to use your scallop circle punches. I have made these in the past and I would have actually made them to share on the blog, however, I'm not making Halloween goodies quite yet and if I bought a bag of Hershey Nuggets I am pretty sure that I would eat them all. So, here is a link to the video instead.

This idea would be just as cute with any stamp set you already have (or you can treat yourself to the Stampin' Up set like I think I will) and those nuggets are just as cute wrapped in a strip of patterned paper. I think a huge jar of these on a buffet table would be so cute as party favors.

Wednesday, August 24

Back to School Goodies

I thought that I would share the back to school treats that I made for my husband's co-workers this school year. 

Supplies needed in case you want to make some of your own:
3 1/2 " x 4 1/2 " yellow cardstock (it's hard to see in the photo but I scored the paper every 1/4" so that once it's wrapped around the candy, it looks more like a pencil)
cut one end with pinking shears
3 1/2" x 1/2" pink cardstock
3 1/2" x 1/2" aluminum foil
1" circles pink cardstock-for the eraser on one end
Rolos candy for the body of the pencil
Hershey kisses adhered to the end for the pencil tip

Here's to a wonderful school year for everyone-especially Maura!

Monday, June 6

Owls

Saw these floating around the internet and decided to make them. So easy to do with any patterned paper that you have on hand. I tend to go for more neutral colors but they'd be adorable in pinks, turquoise, etc.
Once again I just made do with punches and supplies from my stash (those hearts and ovals are hand cut) but they would be a bit easier with the Sizzix pillow box die, a 3/4" and 1 1/4" circle punch, large oval punch and the Stampin' Up trio of hearts punches.

Wednesday, March 16

St. Pat's Goodies

I made these little mini pillow boxes for this year's St. Patrick's Day goodies. Two of the leprechaun's golden nuggets fit inside. The perfect size for just a little Irish treat.

Friday, March 4

Stamp Camp Project

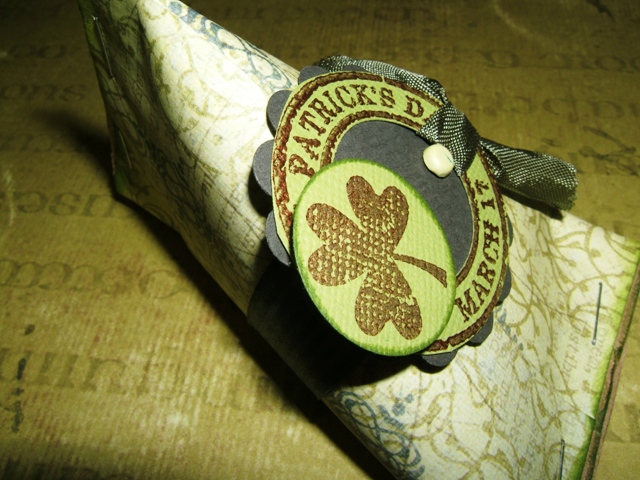
 Time for my favorite holiday - St. Patrick's Day!!! I think 'tis the wearin' o the green on that day that I look forward to.  Anyway, I loved Sheila's idea with the toilet paper rolls and have been saving mine for this project - no card for me this month.  Instead my fellow "campers" will get a treat for my favorite holiday!
 I started off with Stampin Up's new St. Patrick's Day stamp, and stamped multiple copies using bronze ink.
 Time for the toilet paper rolls I'd been hoarding away for this project, and green chocolates that I put into little bags to go inside the roll.
 In looking at the stamped design, I decided to switch it up a bit, and punch out the center. I added some ribbon, and adhered the "ring" portion to a scallop punched background.  Then I popped off the shamrock and added a green brad.
 I decided to cover the rolls with patterned paper, put a strip of coordinating paper around it, and then the "medallion" on as the final decoration.  I did find that a regular stapler worked better to hold the cardboard together, but I also discovered that I could just as easily make a tube out of heavy weight paper, and I did not need the toilet paper roll at all.
Hope everyone enjoyed their treats!!

Monday, December 13

Holiday Treat Boxes

I thought that I would share this year's treat boxes for my husband's co-workers and also the neighbors. 
I used this template for a bon bon box. I did size it a bit smaller so that I could fit it into my Cuttlebug for the snowflake embossing. I liked that added detail.

Tuesday, November 23

Pilgrim Hats

I just finished up these cute little Pilgrim Hat Goodies for my husband's coworkers and also for our Thanksgiving table setting. It's not too late to make some of your own. Three ingredients and they are super easy. 

Supplies: Nabisco Famous Chocolate Wafers, Mini Reese's Cups, Orange Icing in a tube.

LinkWithin

Related Posts Plugin for WordPress, Blogger...

Pinterest