Sheila and I have been doing December Dailys for quite awhile, so I thought I would take a trip down memory lane with this post and share past ones we have done. Click on the "December Daily" label on the side for many more posts and ideas for pages. Hope this gives you some inspiration!
Click here.
Click here.
Click here.
Click here.
Click here.
Click here.
Click here.
Here are a few tips to get you started.
1. Choose the style of book you want to use, whether it is chipboard, plastic, fabric, a Snap album, or a Smashbook.
2. Choose a coordinating kit to work with or create your own kit. Put the paper and embellishments in a pretty basket near your work space. You will work much faster if you are not continually digging through your stash.
3. Build the base this month, so in December you can focus on snapping some great shots and journaling your story.
Above all, have fun with your December Daily! I'll be starting mine soon and will post my progress, and will be looking forward to seeing yours!
Showing posts with label december daily. Show all posts
Sunday, November 2
Friday, December 28
December Daily is....Done! (And it's still December)
I will admit, the last ten pages went together pretty quickly. I either took lots of photos for a day, or none. I also realized that I did not get a lot of people shots at the different events this season. I used the 18th just to reminisce about Christmas past.
Lots of photos for the big day, so I printed out a bunch of mini wallet size to use them all....like little snapshots into the day.
1. I need to remember to take a photo each day
2. I need to remember to put the people back in to those photos
3. Too much chipboard makes a fat book
4. Jot down a note each day on a post it and stick it to the page, so I remember when I go back to journal
5. Love those Chic Tag embellishments (thanks soapHousemama!)
6. Always do this with my sister, because Sheila keeps me on track with DD!
7. Do all the base book ahead, so it is ready to go
8. Use a kit or coordinating papers to keep it simple
9. Share your ideas with others (and they will share right back with you)
10. Remember the little moments and joys of the season, because they truly mean the most
And now....I can't wait to see how you finished yours, Sheila! :)
Lots of photos for the big day, so I printed out a bunch of mini wallet size to use them all....like little snapshots into the day.
Once again, I have made a book that won't close! I really tried to keep it simple and not add too much, so it must be the chipboard, right? Or perhaps my memories don't want to be closed up. 
So, to follow in SoapHouseMama's footsteps - what did I learn from this? I learned:
1. I need to remember to take a photo each day
2. I need to remember to put the people back in to those photos
3. Too much chipboard makes a fat book
4. Jot down a note each day on a post it and stick it to the page, so I remember when I go back to journal
5. Love those Chic Tag embellishments (thanks soapHousemama!)
6. Always do this with my sister, because Sheila keeps me on track with DD!
7. Do all the base book ahead, so it is ready to go
8. Use a kit or coordinating papers to keep it simple
9. Share your ideas with others (and they will share right back with you)
10. Remember the little moments and joys of the season, because they truly mean the most
And now....I can't wait to see how you finished yours, Sheila! :)
Monday, December 24
Catching up with December Daily
Beach Day in science class - studying beach sands, and having fun!
Crop day of fun! And I won this cool prize!
A few thank you cards I designed on the ninth.
One of my traditions in December, especially the last couple of weeks is to wear all of my different Christmas Pins wherever I go. My students enjoy this and check them out each day. (Many are Sheila's creations)
Neither of our December Daily's would be complete without our tribute to the Red Cup at Starbucks!
Here is a story about my own little miracle plant I have at school.
Love these little houses I made! They are up on the mantle for the holidays.
December 14...a sad day for all. On our family hike at Thanksgiving, we found this on the beach, and it seemed appropriate for today.
My research class gave me this tree as our mascot, and we decorated "Spike" for Christmas. Love the Dr. Who Tardis ornament!
I had to include the card I made to mail out to long distance friends.
And the family photo from our Thanksgiving hike ( I don't usually add a photo, since we are all grown up now, but it was fun to do.
Maybe, just maybe, I will finish my DD this month (and my Sept. LSNED before 2013 - LOL!)I think I'll link up to Layout Love Linky over at the Purple Mailbox.
Monday, December 17
December Daily continued
Of course my December Daily has a tribute to Starbucks!
I adhered part of their holiday bags right onto a heavy chipboard page. Here is the backside with one of their pastry bags.
I cut a larger journaling card to place inside and embellished with one of my Starbucks flair badges.
I decided to stitch a cup sleeve onto the card.
And I love how it turned out!
I'll add journaling right around it.
Now, off for a cup of that good Holiday Blend.
I adhered part of their holiday bags right onto a heavy chipboard page. Here is the backside with one of their pastry bags.
I cut a larger journaling card to place inside and embellished with one of my Starbucks flair badges.
I decided to stitch a cup sleeve onto the card.
And I love how it turned out!
I'll add journaling right around it.
Now, off for a cup of that good Holiday Blend.
Thursday, December 13
More December Daily Pages
No December Daily book of mine is complete without a tribute to my two favorite coffee companies. I was at Caribou Coffee first thing in the morning when their Reindeet Blend was available. So of course I had to include a page about my absolute favorite Christmas coffee.
I included a holiday gift card in a small pocket and am keeping it in place with a heart shaped paper clip embellished with a little washi tape flag. I skipped a photo for this page and went instead with a cup sleeve and their napkins. I'm going to add the journaling right onto the red one.
Since this is the busy season for my etsy shop, I snapped a photo of packaging up an order, added a business card and will journal in the space leftover.
Stay tuned for my Starbucks tribute.
I included a holiday gift card in a small pocket and am keeping it in place with a heart shaped paper clip embellished with a little washi tape flag. I skipped a photo for this page and went instead with a cup sleeve and their napkins. I'm going to add the journaling right onto the red one.
Since this is the busy season for my etsy shop, I snapped a photo of packaging up an order, added a business card and will journal in the space leftover.
Stay tuned for my Starbucks tribute.
Sunday, December 9
December Daily-Sheila's Way
I love what Maura is doing with her version of December Daily this year and wanted to share the beginnings of what I have planned. I think this is one of my favorite projects to make. I chose a Simple Stories Sn@p Binder to use--I really like the variety of divided page protectors--I think it helps to simplify the process. I also bought a set of digital elements that I printed out and cut to size for journaling and embellishments.
Here is a view of my stash on my craft table:
I'm really keeping it simple this year so as not to become overwhelmed. Here is a better view of the cover.
and the introduction page.
Supplies used: Stamps-Technique Tuesday: December Daily 2012 by Ali Edwards.
Here is a view of my stash on my craft table:
I'm really keeping it simple this year so as not to become overwhelmed. Here is a better view of the cover.
Supplies used: Stamps-Technique Tuesday: December Daily 2012 by Ali Edwards.
Thursday, December 6
December Daily -the story begins!
I still have to print out some photos, but I am trying to get as much of the pages done as possible. Those cute little tags...thanks to SoapHouseMama (I won her Layout Love Linky). Then, I forgot to take a photo at the coffee shop with my friend Michelle, so just used the cup holder.
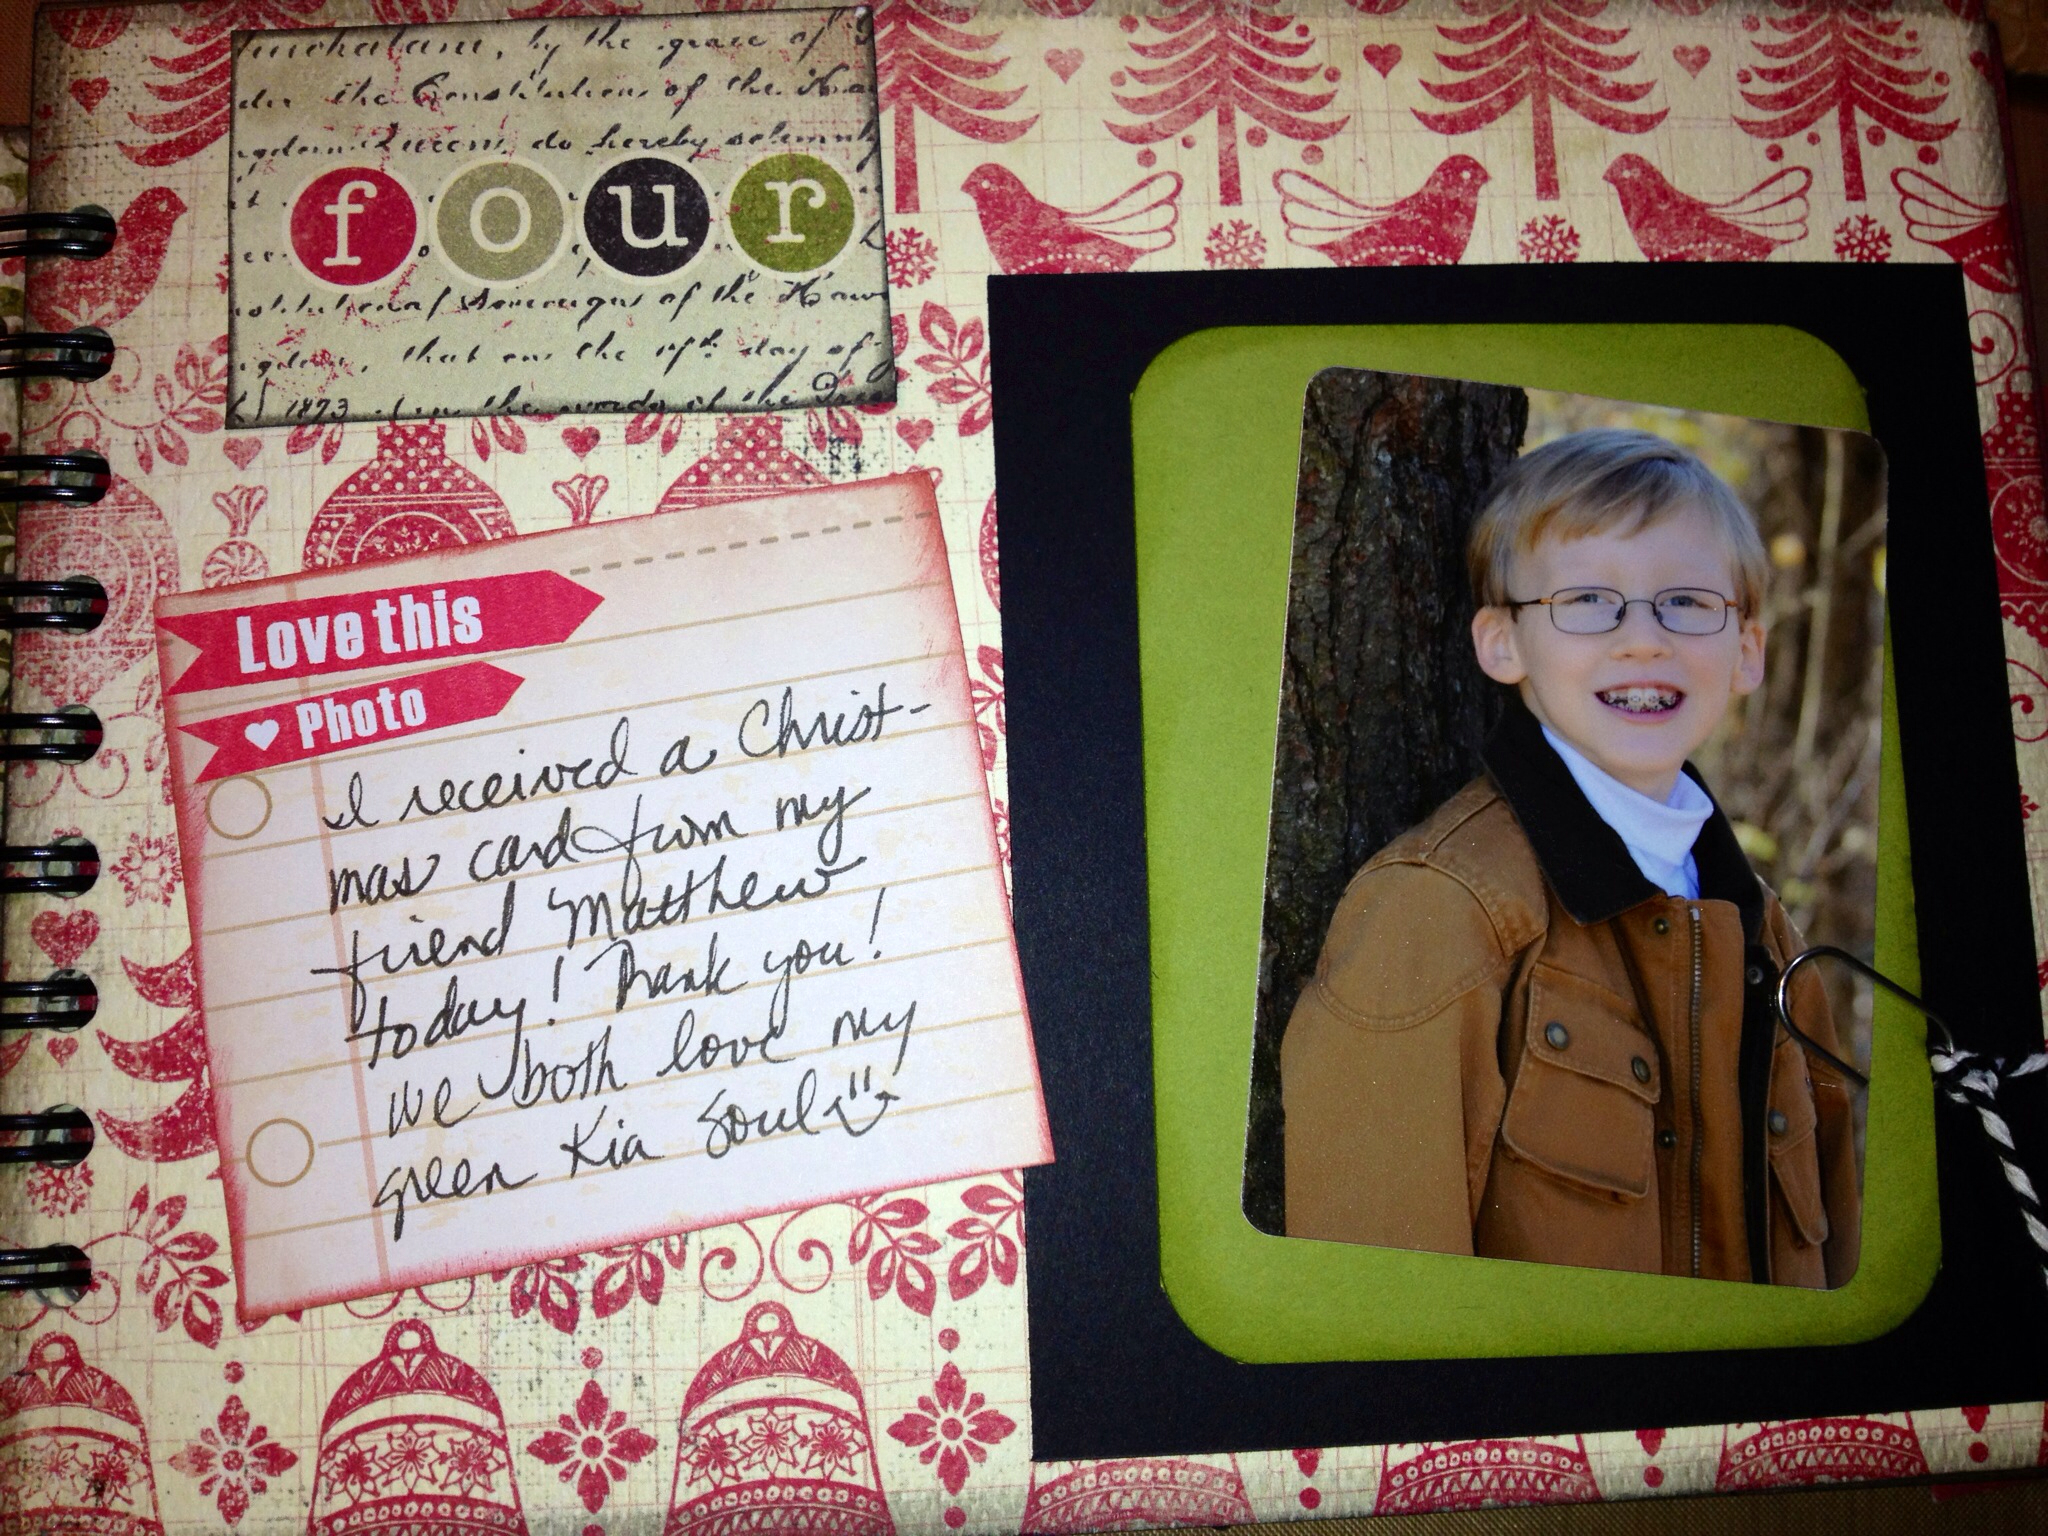
Opened my mail tonight and I got a cute Christmas card from my young friend, Matthew, and knew this would make the perfect memory for today. It also reminds me of our ice cream trip in my green Soul this summer, which he loves too.

Wednesday, December 5
It's December Daily Time!!
Maura's cover, and notice the cute little additions in the upper right corner? That is from my SoapHousemama happy mail (thanks!!!), and Chic Tags.Tuesday, January 10
Musings from the December Daily
We both ran into some glitches this year with our December Daily, so in thinking back over it, we each have some ideas on how to make the process flow more smoothly. Maybe these ideas will help you through your next big project.
Maura's top 3:
1. Don't worry if your photos are not perfect - use them anyway. You can always make a hat to put on top of the head that's not there. These are part of your life now - it's ok if it's dark, blurry, etc. - make it work for you. Remember, it's the memory you want to share.
2. Make a template for your pages. This makes it easy to get all the pages done ahead of time. Fill in the extras when you add your photos and journaling.
3. Use a kit...it has everything you need, it's coordinated and it will save you time.
Sheila's top 3:
1. Design your album to fit your photos, not the other way around. For instance, if you know that your photos are going to be easiest to print at a 4x6 size, don't make pages that are more suited to 6x8 photos. Keep your template more to scale so that you are not spending all your time on the computer resizing photos. Even though I like the larger photos, I complained about this step each and every time.
2. Follow Maura's advice and buy that ONE kit that you just love. Then shop your supplies. You'd be amazed at what supplies you already have in your stash that are perfect for a December Daily. I spent time going through all my drawers and pulled out tags, labels, twine, brads, ribbon, journaling spots, embellishments etc. and put them all in a big bag and in the holiday decoration box to be pulled out each Christmas.
3. Design your foundation pages ahead of time. One year I had the page templates all done, printed out and ready so that I just added the photos, the journaling and an embellishment or two and my day was complete. That was definitely easier than trying to catch up on December 10th this year.
....and remember to enjoy the season as you document it.
Maura's top 3:
1. Don't worry if your photos are not perfect - use them anyway. You can always make a hat to put on top of the head that's not there. These are part of your life now - it's ok if it's dark, blurry, etc. - make it work for you. Remember, it's the memory you want to share.
2. Make a template for your pages. This makes it easy to get all the pages done ahead of time. Fill in the extras when you add your photos and journaling.
3. Use a kit...it has everything you need, it's coordinated and it will save you time.
Sheila's top 3:
1. Design your album to fit your photos, not the other way around. For instance, if you know that your photos are going to be easiest to print at a 4x6 size, don't make pages that are more suited to 6x8 photos. Keep your template more to scale so that you are not spending all your time on the computer resizing photos. Even though I like the larger photos, I complained about this step each and every time.
2. Follow Maura's advice and buy that ONE kit that you just love. Then shop your supplies. You'd be amazed at what supplies you already have in your stash that are perfect for a December Daily. I spent time going through all my drawers and pulled out tags, labels, twine, brads, ribbon, journaling spots, embellishments etc. and put them all in a big bag and in the holiday decoration box to be pulled out each Christmas.
3. Design your foundation pages ahead of time. One year I had the page templates all done, printed out and ready so that I just added the photos, the journaling and an embellishment or two and my day was complete. That was definitely easier than trying to catch up on December 10th this year.
....and remember to enjoy the season as you document it.
Sunday, January 8
A few more pages....
| My students decorated my classroom with snowflakes, and lights on the plant. |
| See, there's the coffee again...prepared for the crop! |
| My fabulous Secret Santa gift - such fun to open...and use. Thanks Mary!! |
| I love how my sons decorated the guitars. I didn't have a photo for the day my husband got back, so used one that I took on Christmas. |
| My sons, Dan and Ben really helped get the house ready for Christmas this year. I wanted a photo of them both, but that one wasn't great, so I laid this other one over it. |
| Printer problems...for some reason my little photo printer takes off the tops of heads, so my solution was to add some funky little hats. |
| The month is not all celebration, and one day included a trip to the eye doctor for me. I took a photo of myself dressed for Christmas, and thought it could represent my appointment. |
| Christmas day! Since I took a lot of Christmas photos, I decided to use the days after the holiday to still showcase them. |
I found as I worked on this, that I had a lot of little glitches, but we all know as scrapbookers and crafters, that you can usually make your mistakes work for you. Words of wisdom: "Remember, it's only paper...."
Friday, January 6
Coffee theme in the December Daily
In looking back over my album, I seem to see a coffee theme flowing throughout. A special brew from Sheila that I have enjoyed throughout the month...a trip to Starbucks with my husband (more than once)...meeting up with friends at the Coffee Beanery to celebrate the holidays...guess I just love a good cuppa joe!
So, in honor of my love of java, here is the page with the acrylic page over it, and then the page itself with photos from the store, the red cup, the bag the cookie came in, and my hubby enjoying his expresso and double chocolate brownie! It just so happens that we went to Starbucks first for coffee and dessert, then out to dinner - you know that saying...have dessert first - well we did!
Now...to see what adventures in javaland come my way in 2012...maybe a cuppa with Sheila one of these days!
So, in honor of my love of java, here is the page with the acrylic page over it, and then the page itself with photos from the store, the red cup, the bag the cookie came in, and my hubby enjoying his expresso and double chocolate brownie! It just so happens that we went to Starbucks first for coffee and dessert, then out to dinner - you know that saying...have dessert first - well we did!
Now...to see what adventures in javaland come my way in 2012...maybe a cuppa with Sheila one of these days!
Wednesday, January 4
December Daily - sharing the goodies
I received a surprise package in December from Sheila with some goodies for my December Daily, so I wanted to share those pages with you.
On my December 6 page, I included the "gift card" as a design element along with the photo.
December 23 was my last day of school for the year, and "bingo" just seemed to work for that day. Originally, I was going to use the bingo card as a page, then was going to make it a date, but in the end used it in place of a photo. I will admit, I was not very good this year at taking a photo a day for the album, so used things like this, or a page of journaling, or stretched my Christmas photos over several pages.

I think my favorite is the final page shown here. This laser cut envelope was perfect to slide a landscape photo into, and yes, we have had a few inches of snow here in the Adirondacks.
On my December 6 page, I included the "gift card" as a design element along with the photo.
December 23 was my last day of school for the year, and "bingo" just seemed to work for that day. Originally, I was going to use the bingo card as a page, then was going to make it a date, but in the end used it in place of a photo. I will admit, I was not very good this year at taking a photo a day for the album, so used things like this, or a page of journaling, or stretched my Christmas photos over several pages.
I think my favorite is the final page shown here. This laser cut envelope was perfect to slide a landscape photo into, and yes, we have had a few inches of snow here in the Adirondacks.
Monday, January 2
December Daily - cover to cover
Finished...and in the month of December, 2011, that is! So guess what I spent New Year's eve doing? Yes, my album...but it was a great way to end the year, creatively.
I thought I would start you off with a peek at my covers of the album. I used clear acrylic, and I like the way you can "peek" through to the layer below - there's a hint of what's to come.
I used a template for my pages, and it helped simplify the whole process for me. I tried to keep it fairly simple this year and not put too much into it, and I think I did.
On my back cover you can see a farewell to the seasonal brews until next year, and my word "believe" for 2012.
I can't wait to see yours, Sheila!!
I thought I would start you off with a peek at my covers of the album. I used clear acrylic, and I like the way you can "peek" through to the layer below - there's a hint of what's to come.
I used a template for my pages, and it helped simplify the whole process for me. I tried to keep it fairly simple this year and not put too much into it, and I think I did.
I can't wait to see yours, Sheila!!
Subscribe to:
Posts (Atom)